3D Sculpts
3D models, the process, and what happens with them
All for Naught - Jezabel


The most recent turnaround for a character design was for the female knight in All for Naught, Jezabel.
With her given character design previously, she has become a passion project to be animated in the future.
I started this model from scratch, roughly blocking out with shapes to form the body, and built over it with flesh and muscle. By simplifying the structure of the body into shapes, it had assisted me in the placment of the limbs.
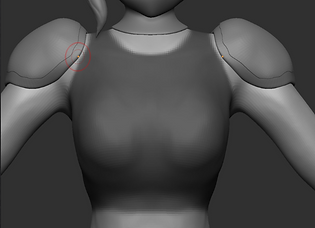

the process of breaking down the anatomy of the characters body into simple shapes acted as a guidline for the clothes and extra armour pieces.
Prior to the character design, Jezabel is a fighter, with multiple accessories to her, like her blade, shoulderpads andmetal skirt, each with their own functional geometry.
In comparison to the left image at the beginning of the blocking phase to the right which shows the aftermatch, it was made significantly differently as i began to build muscle and flesh over the limbs, and merging them.
Moving onto the miscellaneous assets like the armour-pads, and boots, which were more easier now that the base of the body was complete.
The character of Jezabel is symmetrical, excluding the position of her hilt, and her cape, that will be simulated in autodesk MAYA.
(All modelled in Zbrush, but still a work in progress)
All for Naught - Statue of Jezabel
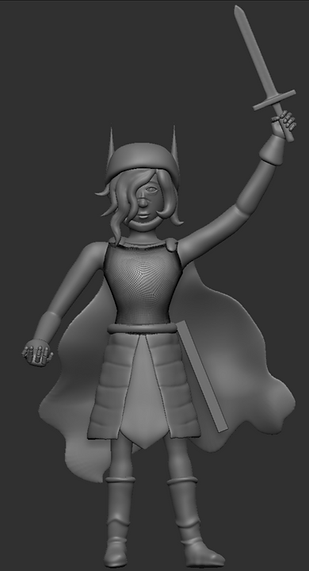
In All for Naught, the narrative is driven by the symbolism of the character Jezabel, specifcally her memorial statue that will appear at both the beginning, and ending of the animation, as we dive into her history of conquest and battle alike through the use of a dynamic, heroic statue.
This section of the project will include the statue of Jezable pre-posed, but stationery in the final animation, though I am considering to bring this sculpt to live with the use of 3D resin printing.
When pre-posing, i had ro be minful that the fingers and feet were also flexed, and not in a standard t-pose to be animated with, and struggled with the placement of the fingers around her raised sword.
Back view of the statue + cape

pre-posed fingers during pre-production
Though the same character, this model of the character Jezabel will not be animated, and was posed in advance to match with the concept art below.
This sculpt is complete, and was enjoyable to work with !


Shattering the glass - Chi
Shattering the glass is a past project that was made in response ot the theme of "Sustainability", where even if there are egnder inequalities within the workplace regarding women in professional careers, they should not be stopped entirely because of a social force.
The character of the protagonist, Chi, is a shark hybrid police officer, a deliberate choice of a tiger shark as they are more of the aggressive shark breeds, though i have interpreted Chi's emotions into aggression through her breaking out of the norms with her bare hands.


During the process of designing the 3D model for Chi, I had to take account for the extra appendages like her tail and arm fins, and to keep her as close to her character turnaround design, exaggerating her features to show her toned physique.
i thoroughly enjoyed modelling the characters hair and shoes, with how textured I was willing to go with it to match the highlights in the hair from her character design.
This model was then exported into autodesk MAYA for future animation work to curate Shattering the Glass. Texturing the character's mesh was done in adoboe substance painter to visualise her from the 2D character design, into thee 3D world to be animated to tell an effective narrative of how unequal the workplace seems to women. I loved creating Chi, especially with the experimenting of textures for her outfit, like the leather boots and fabric shirt, because you will not always think of just the look of the character, but the materials that they wear, and how they react ithin a 3D space.


Run Rabbit Run - Ghost twin (boy)

Run Rabbit Run, a group game prototype with the narrative of a horror-esque puzzle game, where the protagonist travels through a maze, silently being haunted by a ghost family.
I was the 3D modeller for the boy twin of the ghost family, whose death relates to being tangled in mystical vines and ivy, while his ghost form initiates a minigame within the maze itself.


After creating the model in Zbrush, it was brought with all the boy's assets into autodesk MAYA to add simple textures, and bound to a skeleton to add an animation for the chase minigame within the game prototype.
on the left is what his character model looks like within MAYA's arnold render after I had attached animations to him with the start-up of his idle pose.
In the image below is how we as a group have imported all the models into the maze, with boundaries around them, as the character performs his floating / idle animation.
With the character being undead, his movements were more floating, a sense of weightlessness as he chases the protagonist.
There was a minigame inside the game prototype that features the ghost boy twin, where he was to chase the protagonist around dark hallways. This meant that his model in Zbrush had to have animation attached to a rig / skeleton into the model, and use this within Unreal Engine.
After the texturing was done within substance painter, the twin boy model was then taken into the games file to insert within the designated minigame for him, all from the pipeline of his design staying consistent through the different applications

Identity - Adam
Identity, an older solo project, the first, but not the most effective piece i have made.
The design of Adam has changed through the stages of po=roduction, until bringing his sculpt into autodesk MAYA, though, i deliberately chose to create a mechanical being to experiment more with texture, and how it reflects with the use of light, like luminescence as it bounces off of hard surfaces like metal.


Adam's design lacked the natural, human appearance, both anatomy-wise and material appearance, so the selling points of his design was more on the textural storytelling, creating shadows, and dramatic perspectives as he approaches the strange tube on the lab.
The character was then rigged in autodesk MAYA, and posed in a way that could portray his curious, but also introverted personality.
Though Adam was one of the older projects produced, I thoroughly enjoyed the process of making an environment around the character, how it would interact with the space, and the way light would bounce off of the reflective textures of metal.
Playing with different camera angles in autodesk MAYA's viewport to experiment with camera angles (before animating), including a low angle, and what the entire set looks like.